


Cookies help us deliver our services. By using our services, you agree to our use of cookies.
Full automatic chicken coop reverse polarity door gate opener 12V 2A light sensor
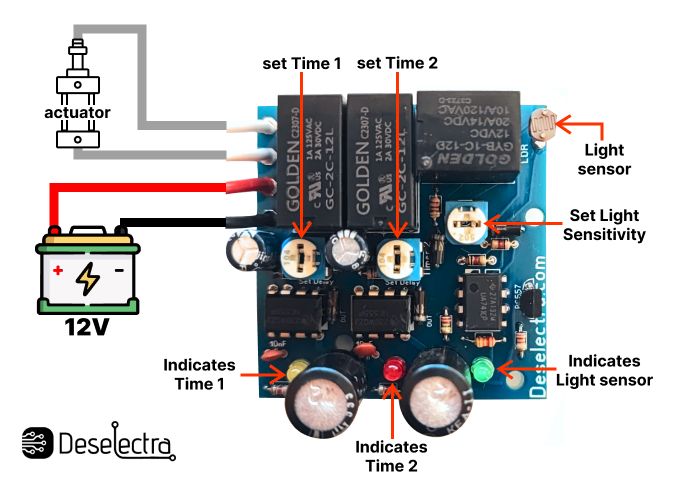
User Guide: 12V DC Electric Door Controller
Overview:
This controller is designed to manage small 12V DC electric doors, such as for chicken coops, garages, and gates. The recommended motor type is a linear actuator (not included). It features two built-in timers for controlling the opening and closing of the door, with automatic polarity reversal for motor operation. Additionally, it comes with an adjustable light sensor for automatically opening and closing the door at sunrise and sunset.
Key Features:
- Two Adjustable Timers:
- Timer 1: Controls the time for opening the door (0-25 seconds)
- Timer 2: Controls the time for closing the door (0-25 seconds)
- Timers are adjustable using the built-in trimmers.
- Light Sensor:
- Adjustable sensitivity to automatically detect sunrise and sunset, triggering the door to open or close accordingly.
- LED Indicators:
- Yellow LED: Indicates motor running in one direction (opening or closing).
- Red LED: Indicates motor running in the opposite direction.
- Green LED: Indicates the light sensor is active.
Specifications:
- Dimensions:
- Length: 45 mm
- Width: 42 mm
- Height: 16 mm
- Power Supply:
- 12V DC with reverse voltage protection.
- Red wire: Positive (12V+).
- Black wire: Negative (12V-).
- Output:
- Reversed 12V DC, 2A output via two white wires (connects to motor).
- Wire Length: 10 cm
- Relays: 2A/12V DC
- Time Adjustment:
- Timers are adjusted by rotating the trimmers clockwise to increase the time.
Important Note:
Please use a 12V DC adapter with a minimum output of 4A to ensure the module operates reliably, especially when starting the motor. A lower ampere rating may cause voltage drops and system resets.
Installation and Operation:
- Power Supply Connection:
- Connect the red wire to the positive terminal (+12V) and the black wire to the negative terminal (-12V) of the power supply (use a minimum 4A adapter).
- Motor Connection:
- Connect the two white wires to the motor (maximum 2A linear actuator).
Adjusting Light Sensor Sensitivity:
- Rotate the sensitivity trimmer (located near the green LED) fully counterclockwise.
- The yellow LED will light up, and the motor will start running in one direction. It will stop after the set time on Timer 1.
- Slowly rotate the sensitivity trimmer clockwise until the red LED lights up, and the motor starts running in the opposite direction. It will stop after the set time on Timer 2.
- High Sensitivity Set: The module is now set at maximum sensitivity.
- Cover the light sensor to simulate darkness, and the motor will reverse direction, operating for the time set by Timer 2.
If you need to decrease sensitivity, rotate the sensitivity trimmer further clockwise. Note that if the sensitivity trimmer is fully set to the counterclockwise position, the module will only operate in one direction.
Working Principle:
When sunlight is detected:
The module will activate the motor, supplying 12V DC for the duration set on Timer 1, causing the door to open. The motor will stop after the set time.When it becomes dark:
The module will reverse the motor's polarity, supplying reversed 12V DC for the duration set on Timer 2, causing the door to close. The motor will stop after the set time.
This cycle will repeat continuously as long as the module remains powered.
Follow the wiring and sensitivity settings carefully to ensure proper operation.
Deselectra electronics