Cookies help us deliver our services. By using our services, you agree to our use of cookies.
Car dome interior light delay switch timer 1-25s 1A 12V negative switching
Limited Time Offer!
Hurry, our best price won’t last long! Click to check out the exclusive deal: Click here to see the best price


User Guide: Dome Light Delay Module for Older Cars
This module is designed to replicate the modern car feature where the interior dome light stays on for 1-25 seconds after the door is closed. It is ideal for older cars that lack this functionality.
Features:
- Automatic Light Control:
When the door opens, the light switches on. After the door closes, the light remains on for the set delay (1-25 seconds) before turning off. - Compatible Lighting:
Can be used with both LED and incandescent lights up to 1A (12 watts). - Negative Door Switching:
Only works with cars that have a negative door switching signal. Please refer to the wiring diagram. - LED Indicator:
Displays the operation status. - Maximum Load:
Controls lights up to 12V/1A. Load can be extended to 1.5A with a heat sink. - Power Supply:
12V DC with reverse supply voltage protection. - Adjustable Time Delay:
Set the delay from 1 to 25 seconds using the 100K trimmer. Rotate clockwise to increase the time.
Wiring Instructions:
Identify the Dome Light Wiring:
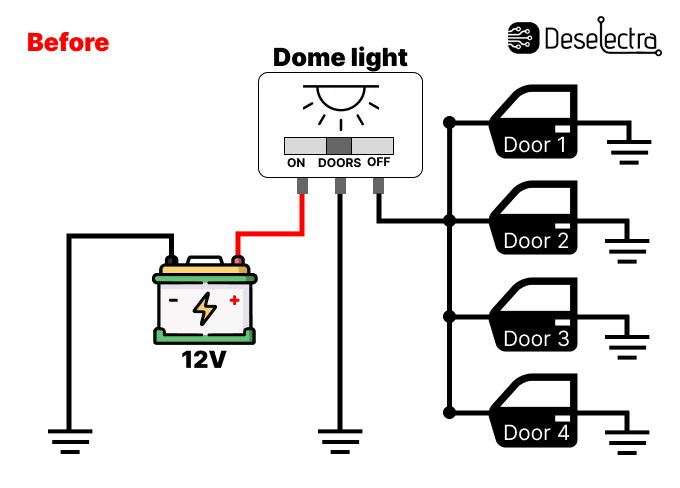
- In the dome light assembly, locate the three connectors:
- One goes to the ground.
- One connects to the battery directly.
- The third is connected to the door switches (which are parallel and directly grounded).
- In the dome light assembly, locate the three connectors:
Cut the Door Switch Wire:
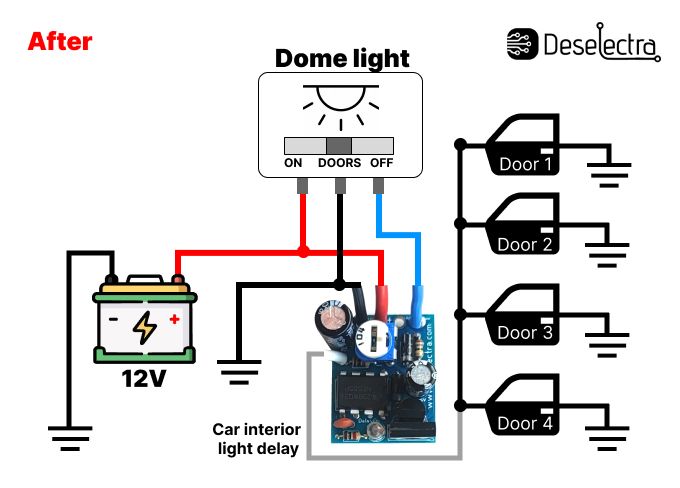
- Cut the wire going to the door switches and proceed with the following connections.
Wiring the Module:
- Red Wire: Connect to positive (+).
- Black Wire: Connect to negative (-).
- Blue Wire: Connect to the door switch terminal of the dome light.
- White Wire: Connect to the cut door switch wire.
Safety Precaution:
Connect the red wire via a 3A fuse for added protection.
Operation:
- Power Cycle:
When first connected, the module will run through a cycle without activation. After this initial cycle, the module is ready to use. - Normal Use:
When a door is opened, the dome light will turn on. After the door is closed, the light will stay on for the preset delay and then turn off automatically.
Additional Notes:
- Ensure correct wiring for proper operation.
- For cars with more than 1A lighting loads, a heat sink or external relay may be required to avoid overheating.
This Dome Light Delay Module enhances the comfort and convenience of older vehicles, providing a modern lighting experience.


